
Welcome to the bigboi Knowledge Base
Your Source for Expert Advice, Troubleshooting, and Product Information
-
WashR PRO
- WashR PRO | How to Determine Correct Generator Wattage
- How to store your WashR PRO
- The WashR PRO has a oil leak
- The WashR PRO is experiencing a water leak
- The WashR PRO motor does not start when switched on
- The WashR PRO pressure drops during use
- The WashR PRO Pressure fluctuates
- The WashR PRO pump is noisy
- The WashR PRO pump is running but does not reach the working pressure
- The WashR PRO When I switch on the unit, the motor hums but does not run
- There is the presence of water in oil on the WashR PRO
- Wash PRO TSS Version only. The motor starts even with gun trigger is released
- WashR PRO TSS Version only. No water delivery when gun trigger is depressed
- How to Adjust your Spray Pressure on the WashR PRO
- How to maintain your WashR PRO
- How to Stop Your WashR PRO
- How to use your Nozzles with WashR PRO
- How to check your oil level before use?
- How to Setup the WashR PRO
- How to Start your WashR PRO
- WashR PRO Manual
- How to Turn On and Off Your WashR FLO
- The WashR FLO Motor refuses to start
- WashR FLO Does not reach high enough pressure
- WashR FLO Maintenance Guide
- WashR FLO Motor starts up but there is no working pressure
- WashR FLO motor stops
- WashR FLO No detergent present
- WashR FLO Output pressure varies high and low
- WashR FLO Spray wand is leaking
- How to Set Up the WashR FLO
- WashR FLO Manual
-
SuckR PRO
- WashR FLO pump is very noisy
- WashR FLO Water is leaking from the pump
- How to Service the SuckR PRO
- How to Use the Extraction Function (Kit Sold Separately)
- Storage and Transportation of the SuckR PRO
- Why Is My Engine Housing Overheating?
- Why Is the Suction Weakening?
- How to Assemble the SuckR PRO
- How to Use the SuckR PRO Vacuum Function (Wet & Dry)
- SuckR PRO Manual
Table of Contents
How to Assemble the SuckR PRO
Table of Contents
Proper assembly of your Bigboi SuckR PRO ensures optimal performance and ease of use. Follow these step-by-step instructions to assemble your vacuum cleaner correctly.
Step-by-Step Instructions
-
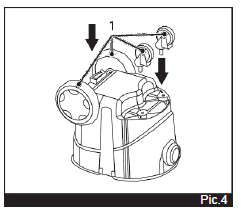
Release and Remove Cover
- Release the lock (1) of the SuckR PRO to remove the cover (2). Pull out the transport wheels and accessories.
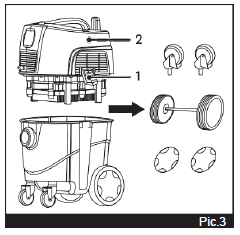
-
Install Transport Wheels
- Install the four transport wheels onto the unit.
-
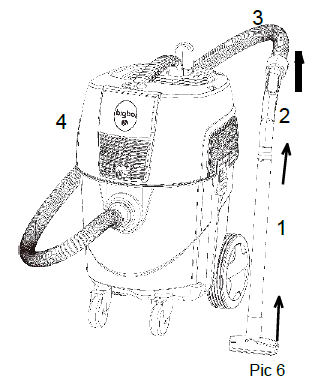
Connect Extension Tube
- Connect the extension tube (1) into one rod.
- Install the hose (3) into the connector of the SuckR PRO (4).
- Connect the hose connector (2) to the rod.
- Install the sofa brush or narrow nozzle to your cleaning tool, depending on your cleaning needs.
-
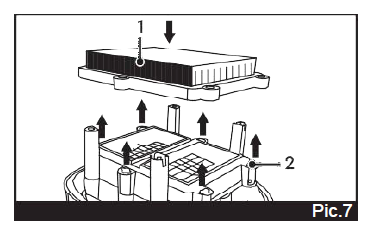
Installing the Filter
- Pull out the eccentric latches (2) from the SuckR PRO cover body.
- Install the cassette filter (1) and fix it with eccentric clamps.
- Depending on the operating conditions, install a paper filter bag in the SuckR PRO if necessary.
-
Installation of a Replaceable Filter Dust Bag
- Install the replaceable filter bag (1) on the seat (3). The rubber seal (2) must fully enter the corresponding groove.
- Pull the filter bag in the opposite direction to the installation to check the fit.

By following these assembly steps, you ensure your SuckR PRO is set up correctly for efficient operation. If you encounter any issues, refer to our troubleshooting guide or contact our support team for assistance.
Updated on 21 Jun 2024
What are your Feelings?
Thanks for your feedback
- Choosing a selection results in a full page refresh.